Google is an integral part of modem genealogical research. Whether we’re conducting a search, reading archived material, taking notes or scanning photos, many of us have come to count on Google’s free tools.
But there’s one research tool that gets missed all too often by family historians because it is hidden inside of Google’s well-known word processing tool, Docs. Today we’re going to show you how you can use this overlooked feature to discover new information about your ancestors and easily keep track of your research while you do it.
To make use of the information in this article you will need a Google account. If you already use Gmail then you already have access to Docs. If you do not you will need to create an account (it’s 100% free). This account will give you access to everything we will cover in this article. Find Google Docs here.
In this article we’re going to take a look at how to use the Explore feature that is built right into Google Docs. This feature, previously known as Research, is a unique and powerful way to make use of Google search as part of your genealogy research. However, to fully appreciate the power of a tool like this we may have to shift the way we think about our research, and the processes we use to uncover new information about our ancestors.
When conducting research we tend to enter details of our ancestors’ lives into a family tree program, filling in facts as we find them. We may use a variety of methods to locate these details – such as direct record searches on various websites, exploration of discoveries and hints connected to our tree, or offline research – but the end result is the collection of a series of facts for each individual.
But the collection and storage of individual facts can cause us to become removed from our ancestors’ lives as a whole, sometimes not being able to see the forest for the trees, so to speak.
Word processing programs like Google Docs give us a different view of our research by forcing us to write down and organize our collected information in a unique way. By using a program like this to create a chronological story about our ancestors’ lives we can gain insights, identify holes and build on what we know very effectively. The Explore tool adds to this by helping us draw out new details from our existing data.
This is similar to one of the strategies used in our comprehensive brick wall action plan available as part of our online courses.
Let’s walk through the whole process in 5 steps so you can implement this strategy in your own research. This feature works best, and in whole, on desktop. While the mobile Google Docs app does offer Explore it is not as effective or easy to use. This tutorial focuses on the desktop version.
Step 1 – Create a New Doc and Add Your Content
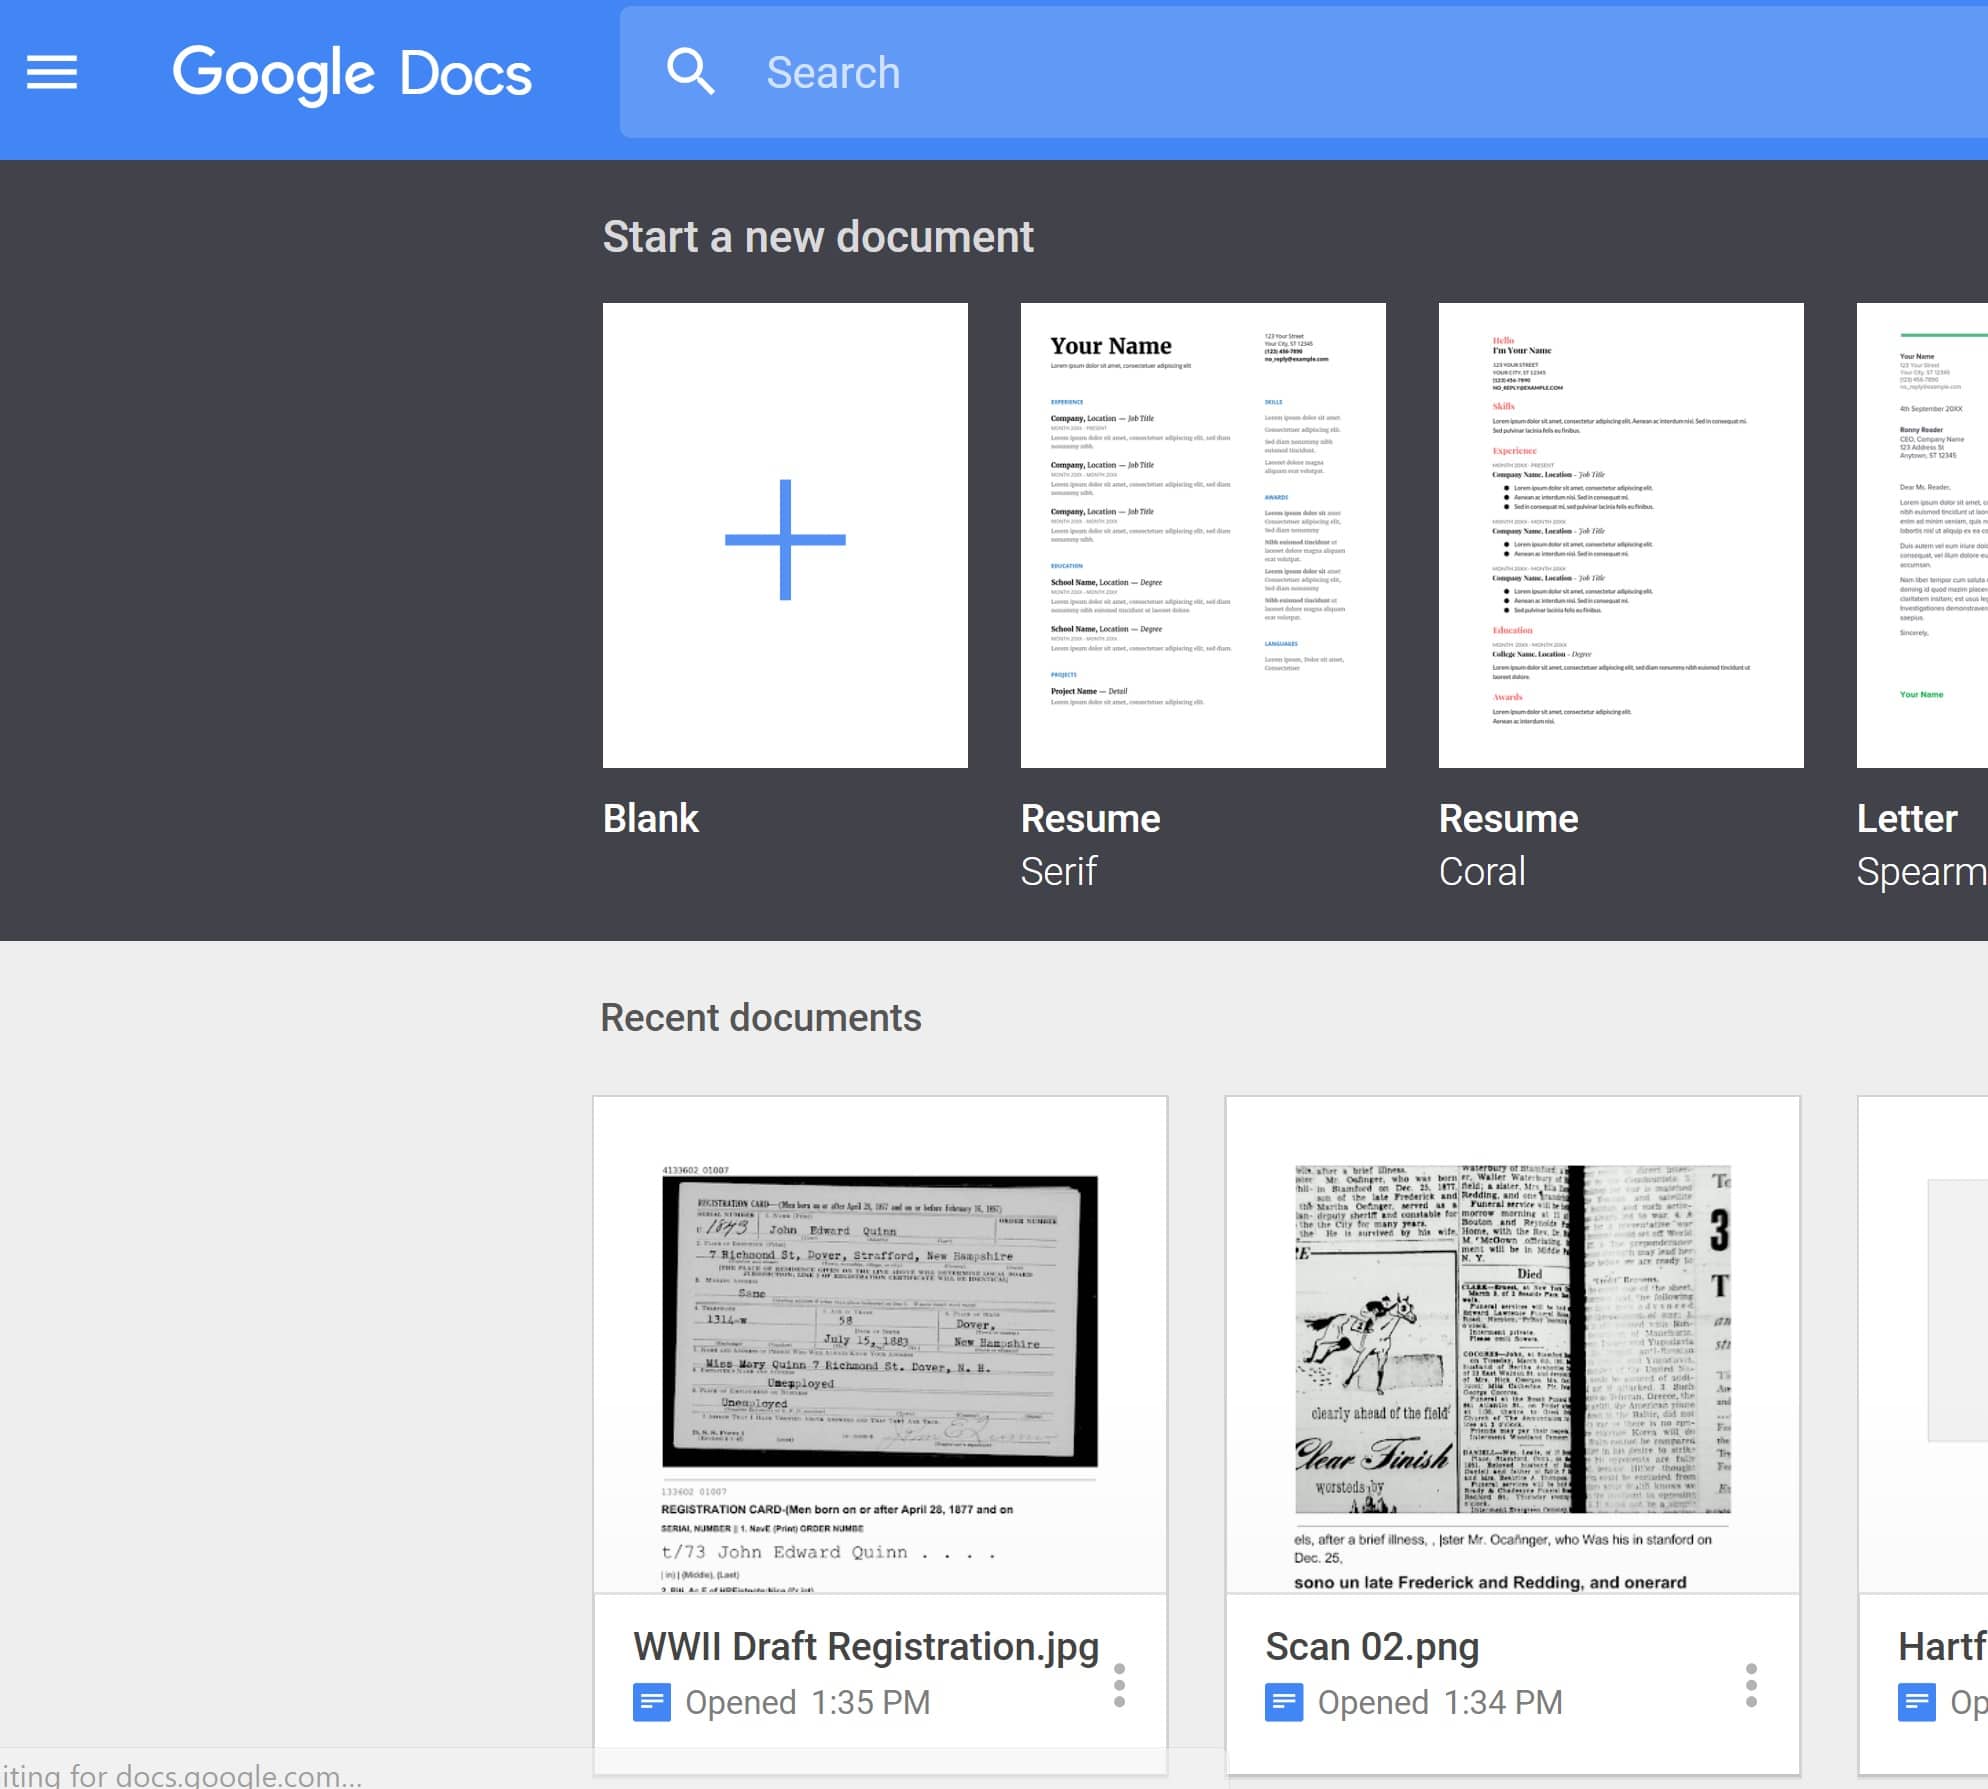
The first thing to do is to create a new document for your research. To do this, head over to Docs and click on the plus sign to create a blank page.
Once you are brought to your new page give it a title that makes sense for the research you will be conducting (such as the name of the ancestor you will be working on, or a specific research problem).
If you’re trying to solve a problem in your research then consider writing a clear research question at the top that you can work on answering. Be specific, such as “In what year did Albert Fairbanks and Emma Reed get married?” and then, if you like, refine it into sub questions such as “Were Albert and Emma married in Minnesota in 1903?” so that you can stay focused and create ideas for more specific searches. We cover how to develop actionable research questions in our online courses.
In this example we are simply going to use the information we have already collected about an ancestor to try and expand our story of him. We begin by entering what we know.

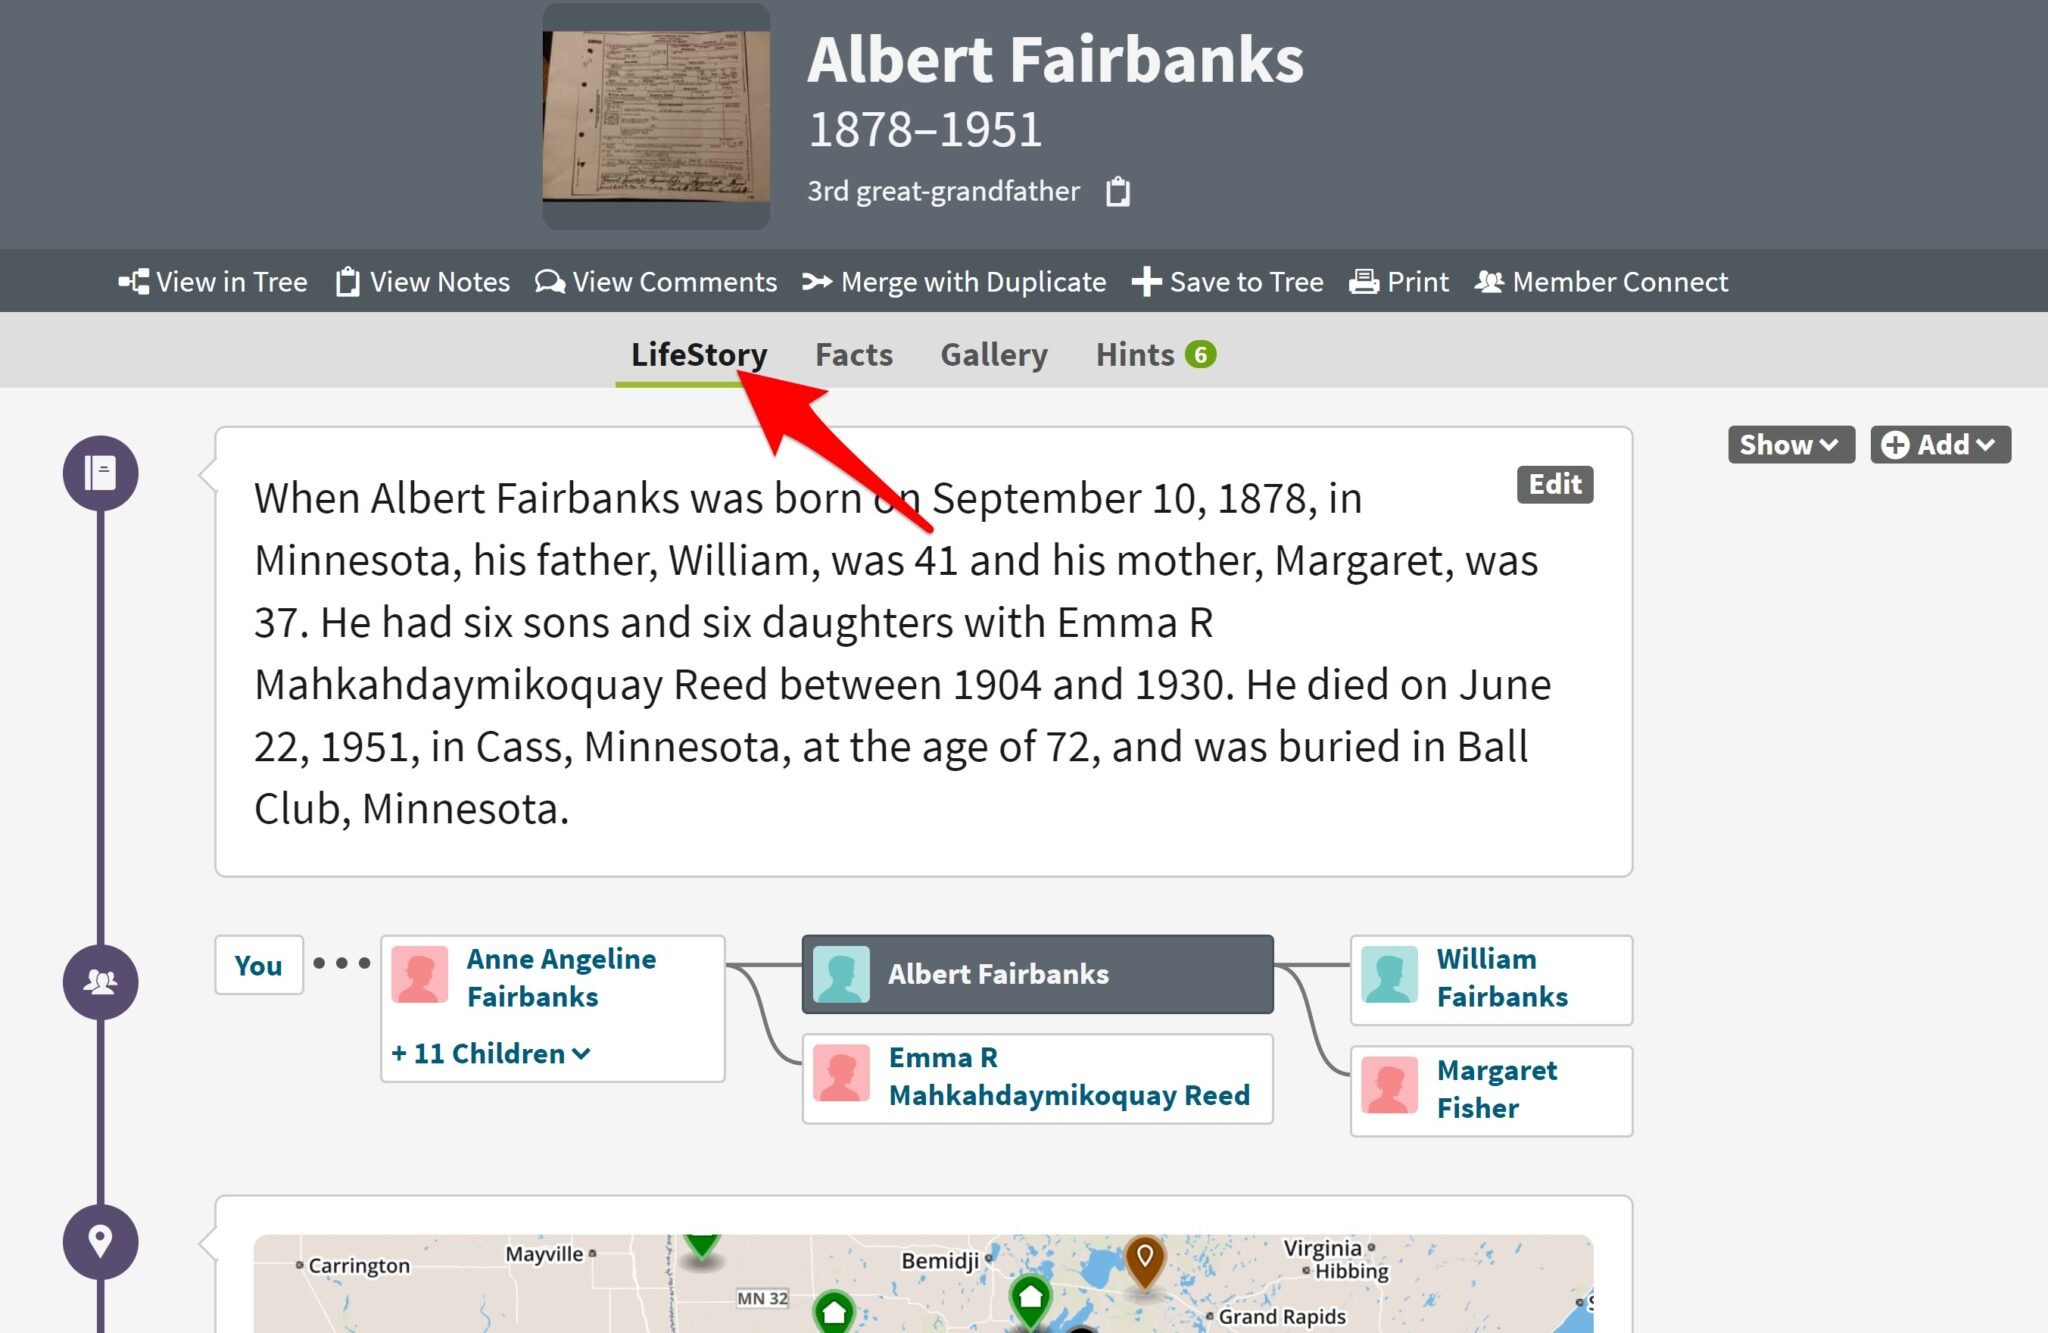
Ancestry’s LifeStory feature, and similar features from various family trees, work well for this project because we can grab the facts from our tree in what is already a story format.
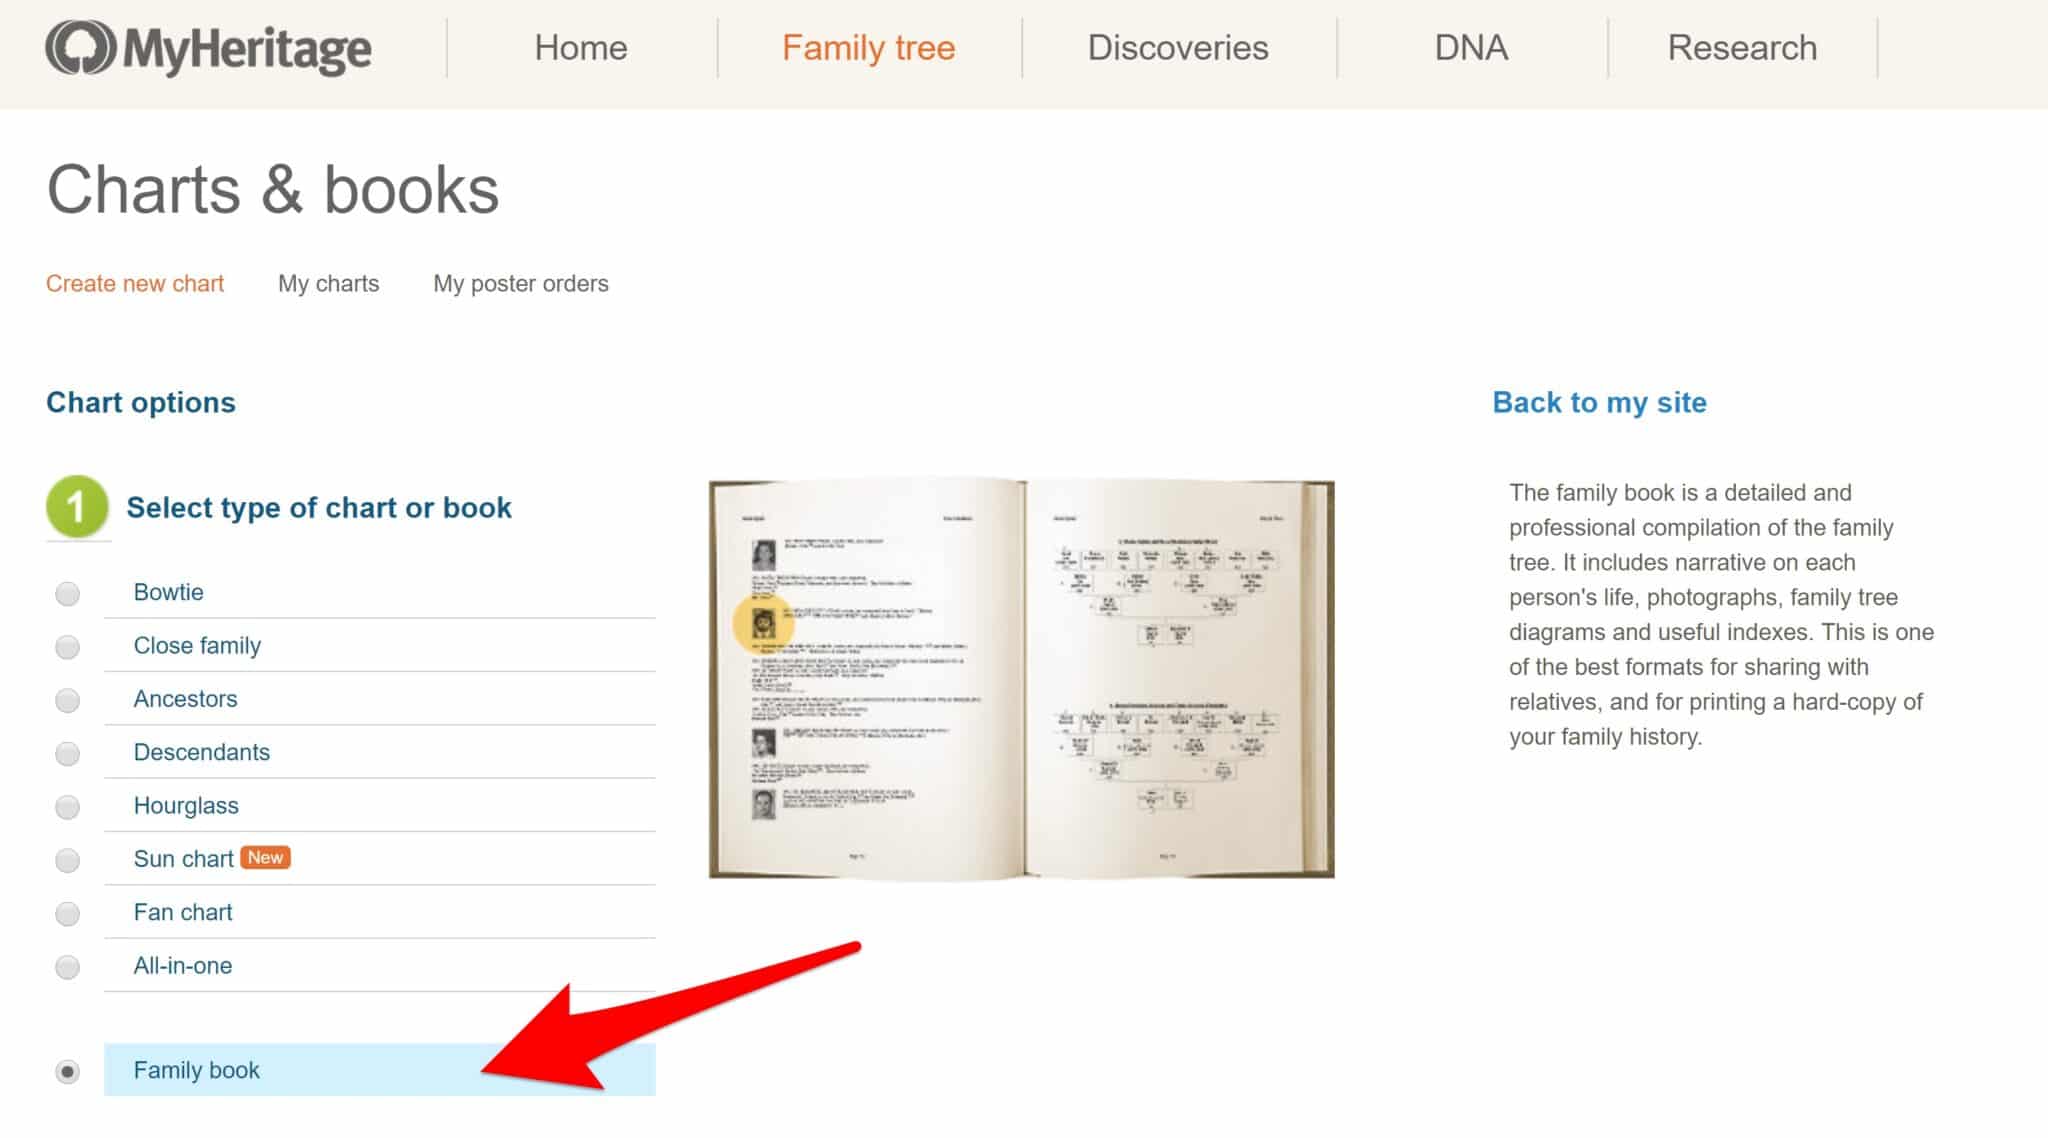
MyHeritage also makes it easy to create a narrative of an ancestor’s life with their Book feature. To find that, select Family Tree from the top menu and then More, Print Charts & Books and then choose the Family Book option from the list.
Simply listing facts that you copy from your tree is also a good way to begin with a project like this – you can always develop those facts into a story yourself or leave them in a more traditional timeline.
Step 2 – Segment Your Information
This step is optional, but provides a good chance to be clear about what we have, what we don’t have and what we want.
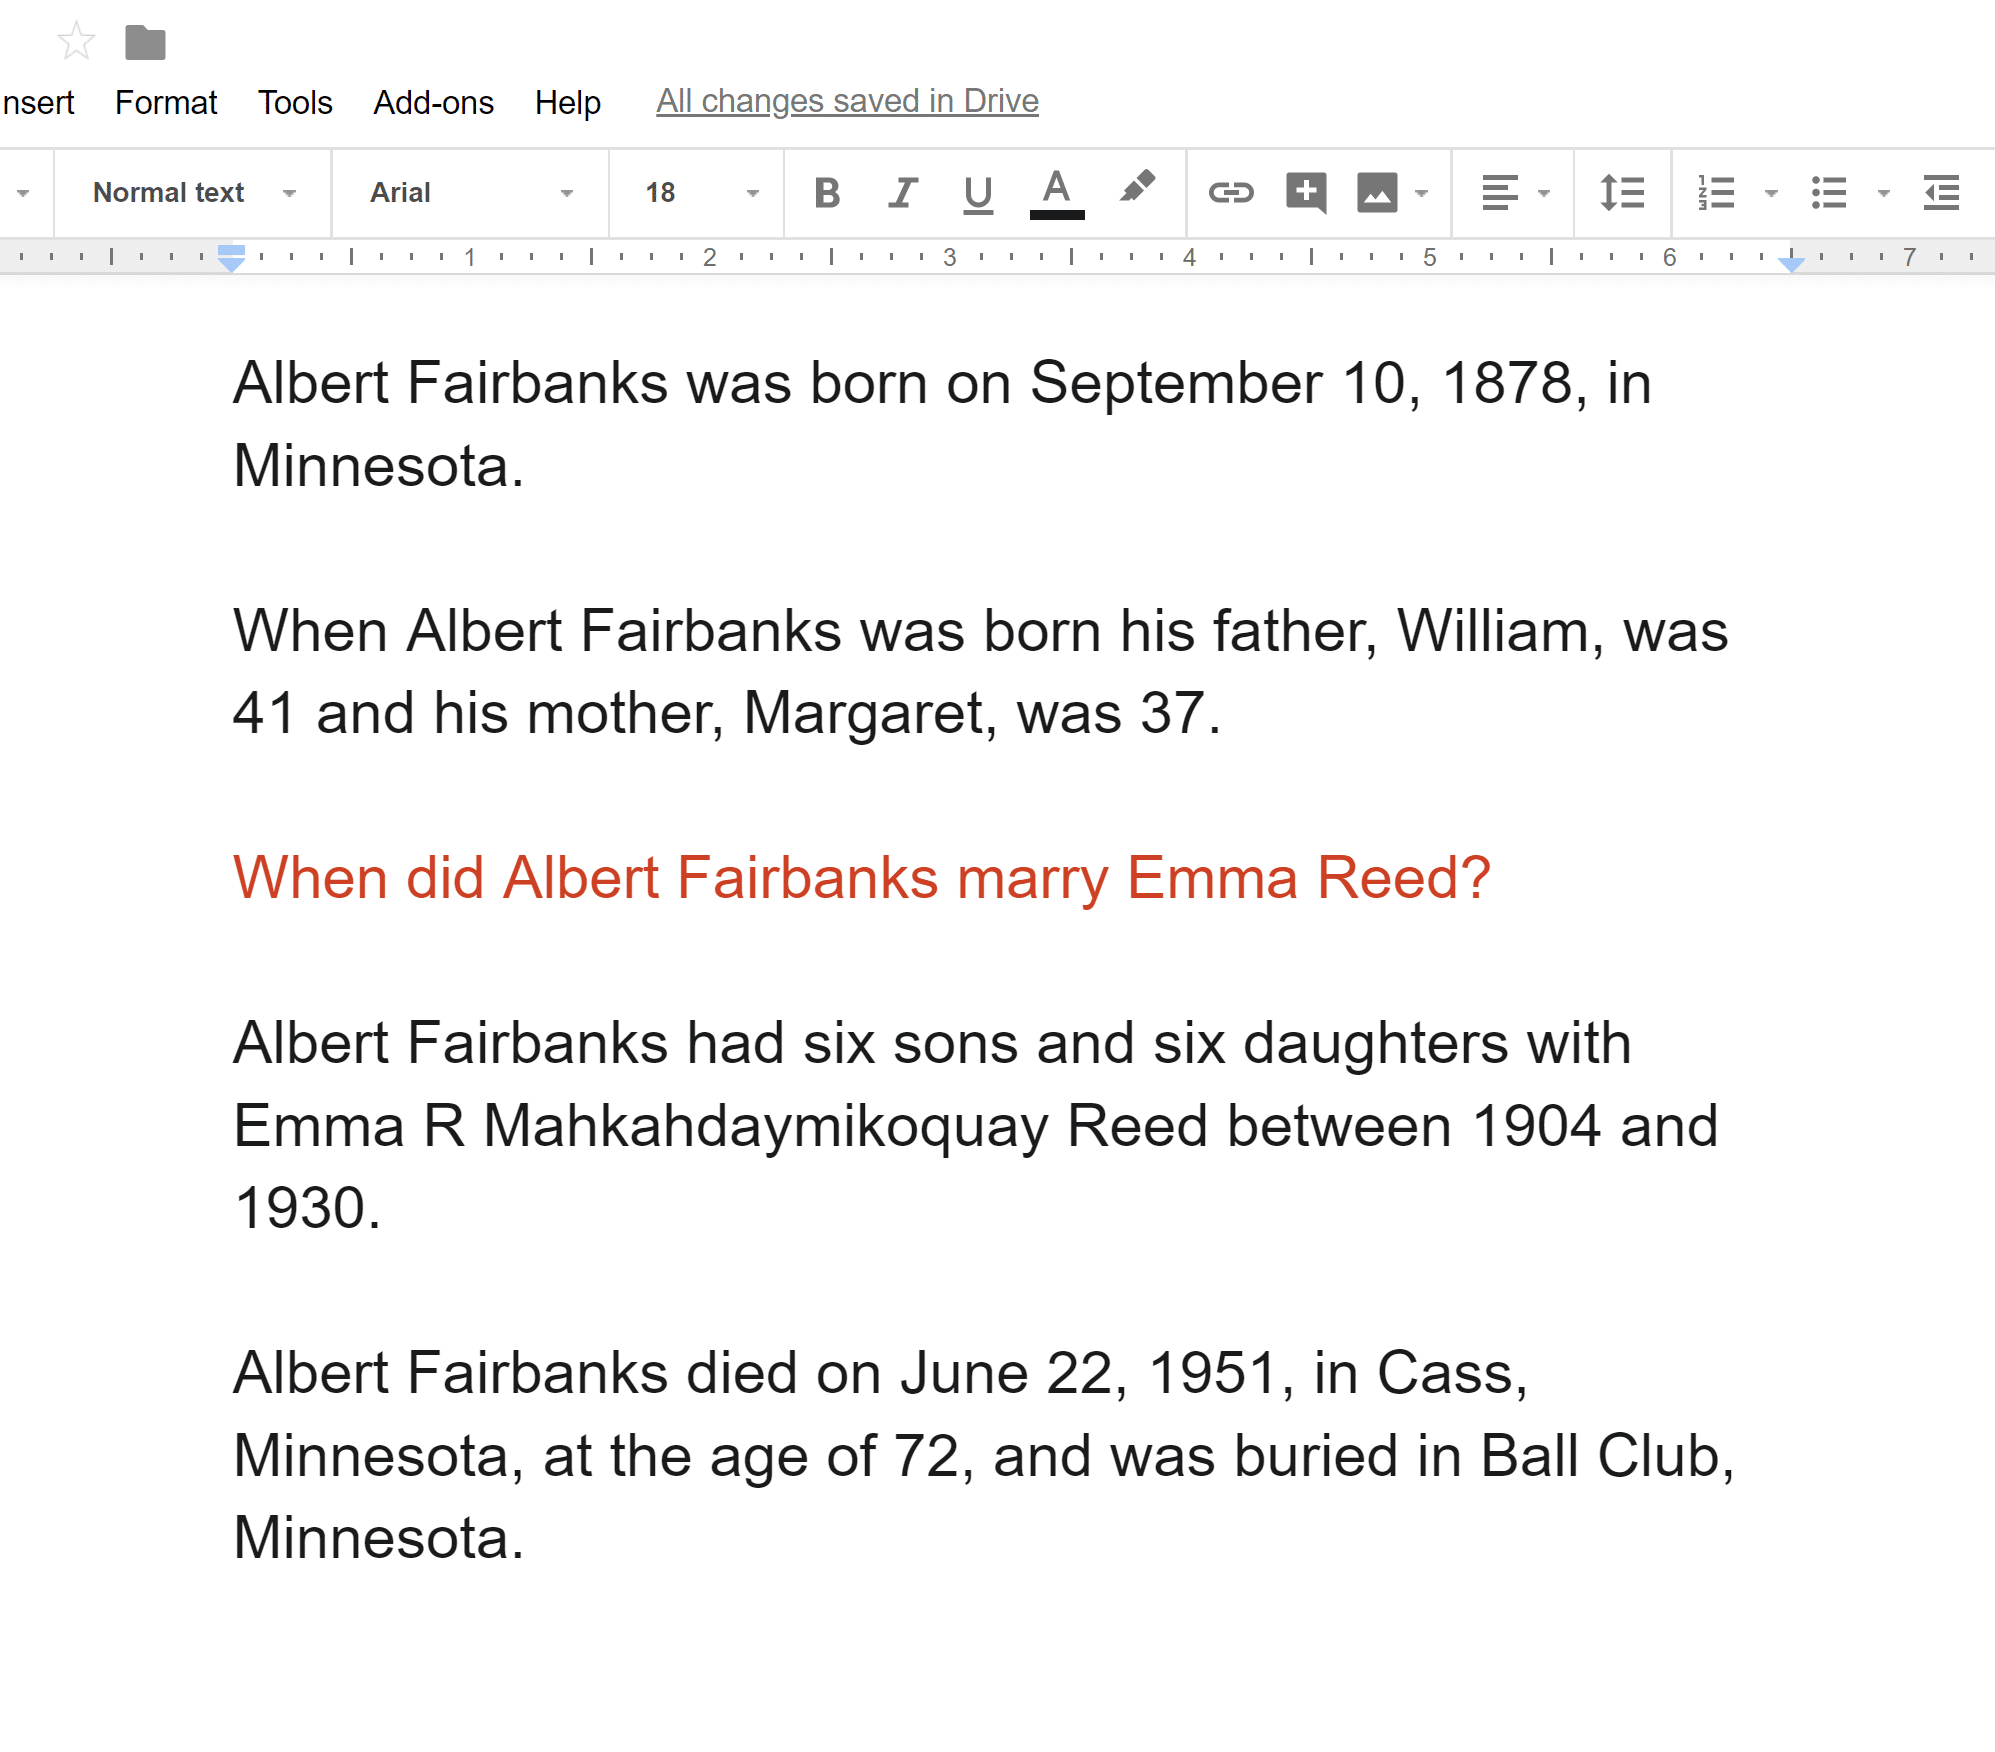
In the screenshot below you can see that we have separated out the story about Albert into parts and entered in questions where gaps in the records exist. This helps us think about Albert’s life as a whole and get focused on trying to flesh out his story.
When writing questions and separating sections, add full names and dates so that you can use these questions more effectively in Explore.
Step 3 – Start “Exploring” Your Information
Now the fun begins. In this step we’re going to use the Explore feature to see what we can discover about Albert.
To begin, simply choose a part of your story and highlight it. Now right-click (CTRL-click on Mac) to open the options menu and select Explore. This will open a new box in the right side of your screen.
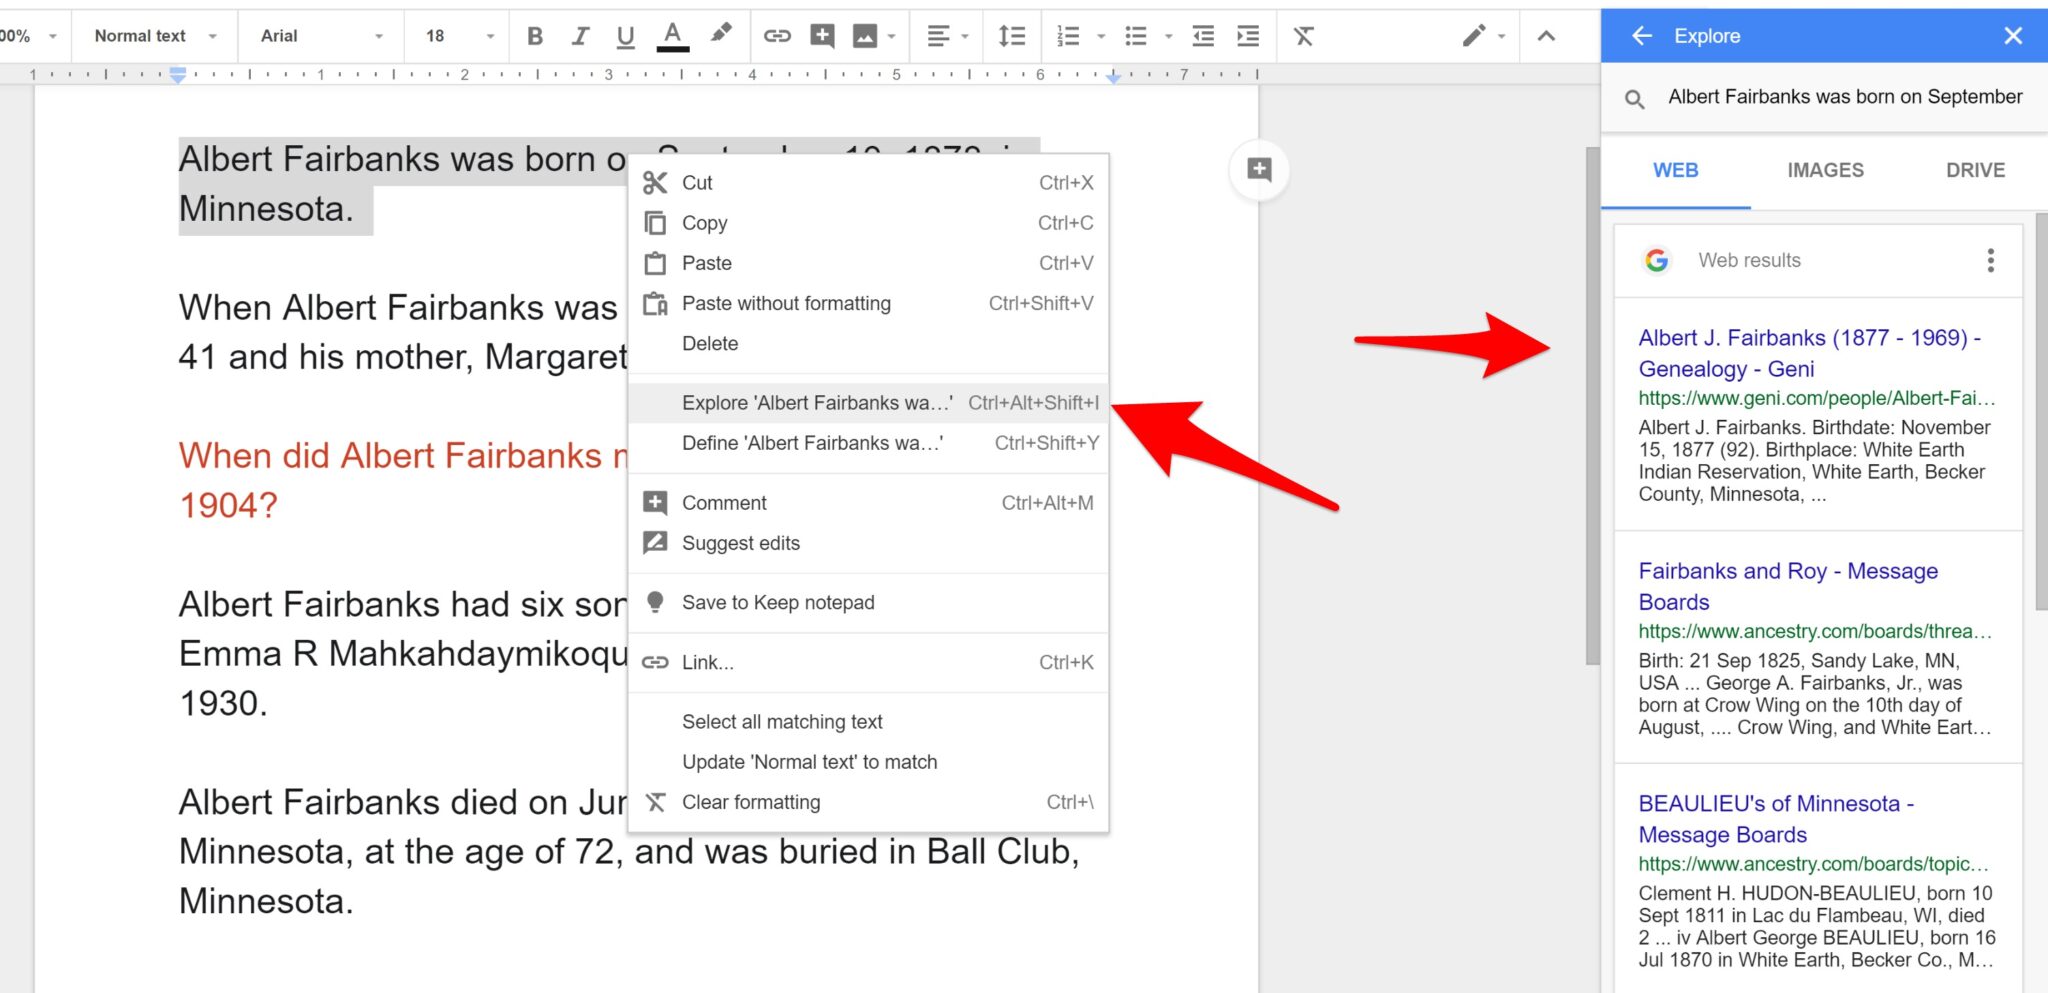
In the box you will see three tabs. The first is Web, the second Images and the third Drive (your own files).
In the Web tab, Google will provide you with six results based on your Explored text and if you select the See All Results on Google link on the bottom or the Web Results link on the top you will be brought to a regular Google search of your text.
The six results presented alongside your document are similar to the top six results that you would get from Google if you had typed the highlighted text directly into a search box – but they are often not exactly the same. On many different searches we found that Google excluded or included different results, presenting an opportunity to discover potentially overlooked pages.
Clicking on one of the web results in this box will open that page in a new tab so that you can easily review the information. If you find something of interest you can add it to your research sheet. Simply copy the text from the page (Highlight, CTRL-C), paste it into your Google Doc (CTRL-V) and then add a citation right in Explore (explained below).
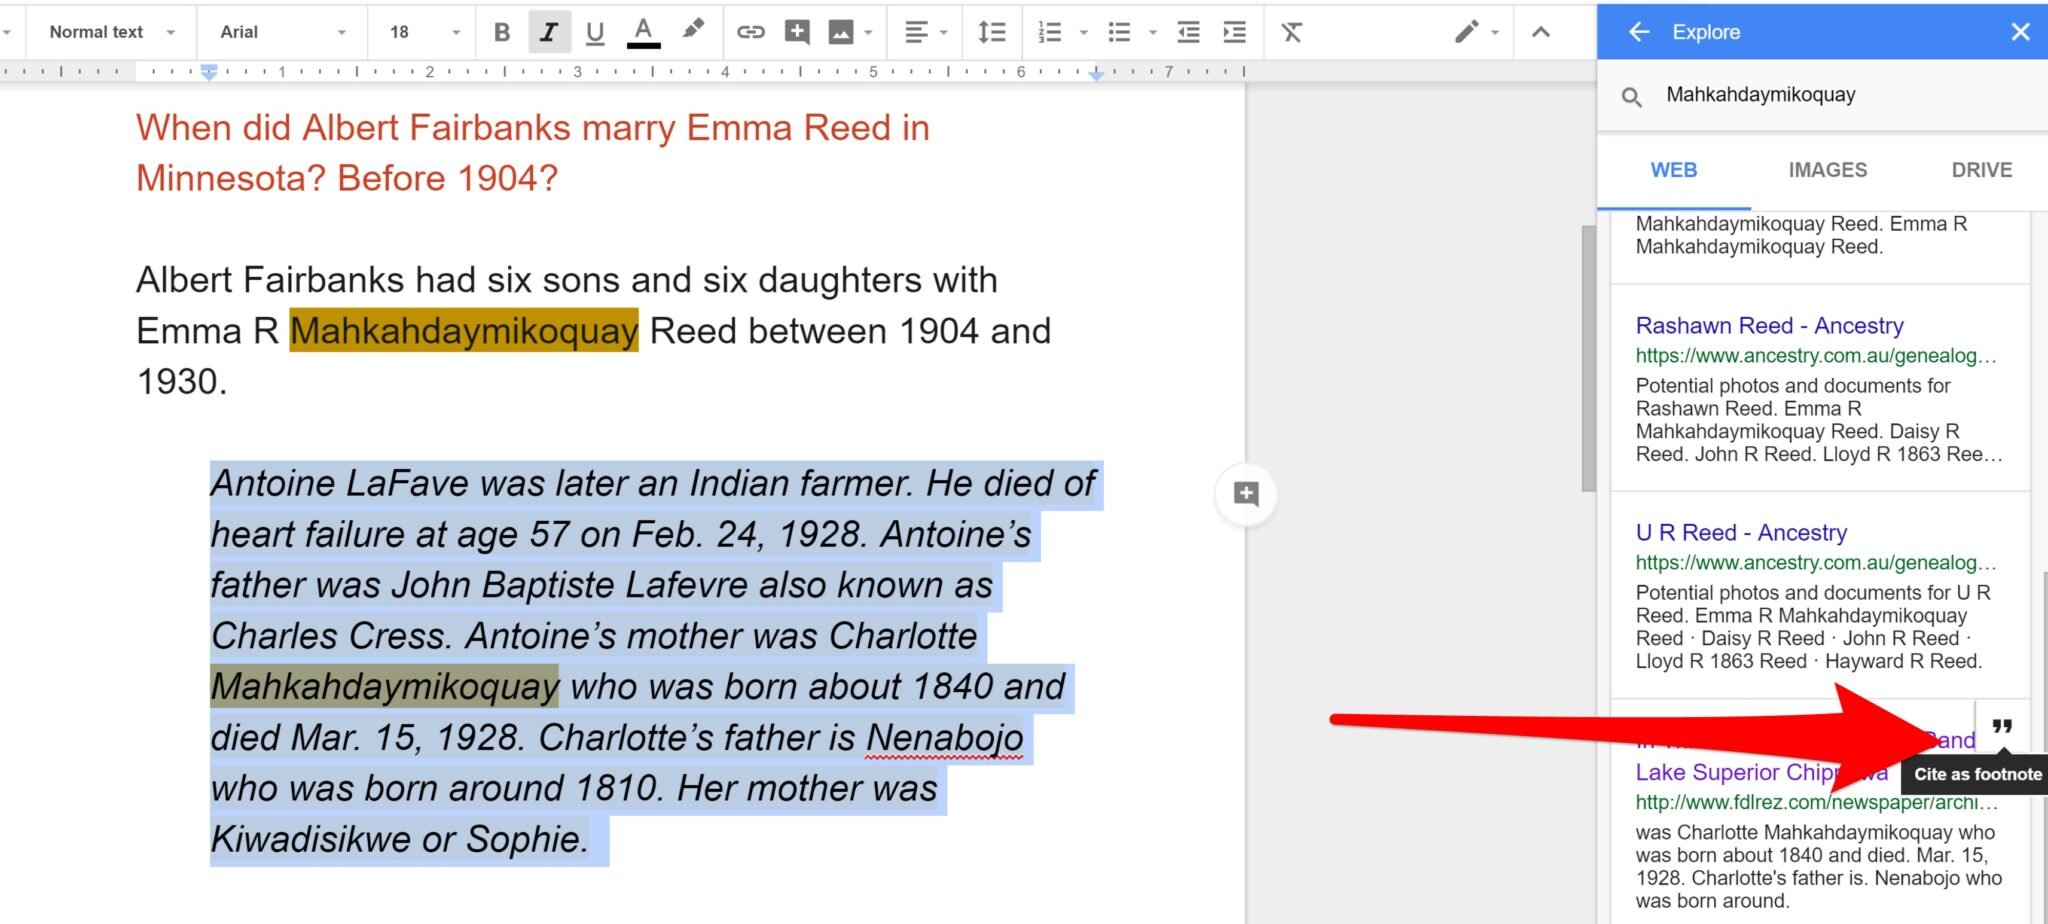
In the screenshot below you can see that we have pasted in a chunk of text we found in one of the results that may pertain to our ancestor. To add a citation to that pasted text we highlighted it and then found the page we collected it from in the box to the right. Rolling over the entry we clicked on the quotation marks. This cites that page as the source and adds that citation to the bottom of the page as a footnote.
Note the cited text at the bottom of the page and the number next to the pasted text that came from that page.
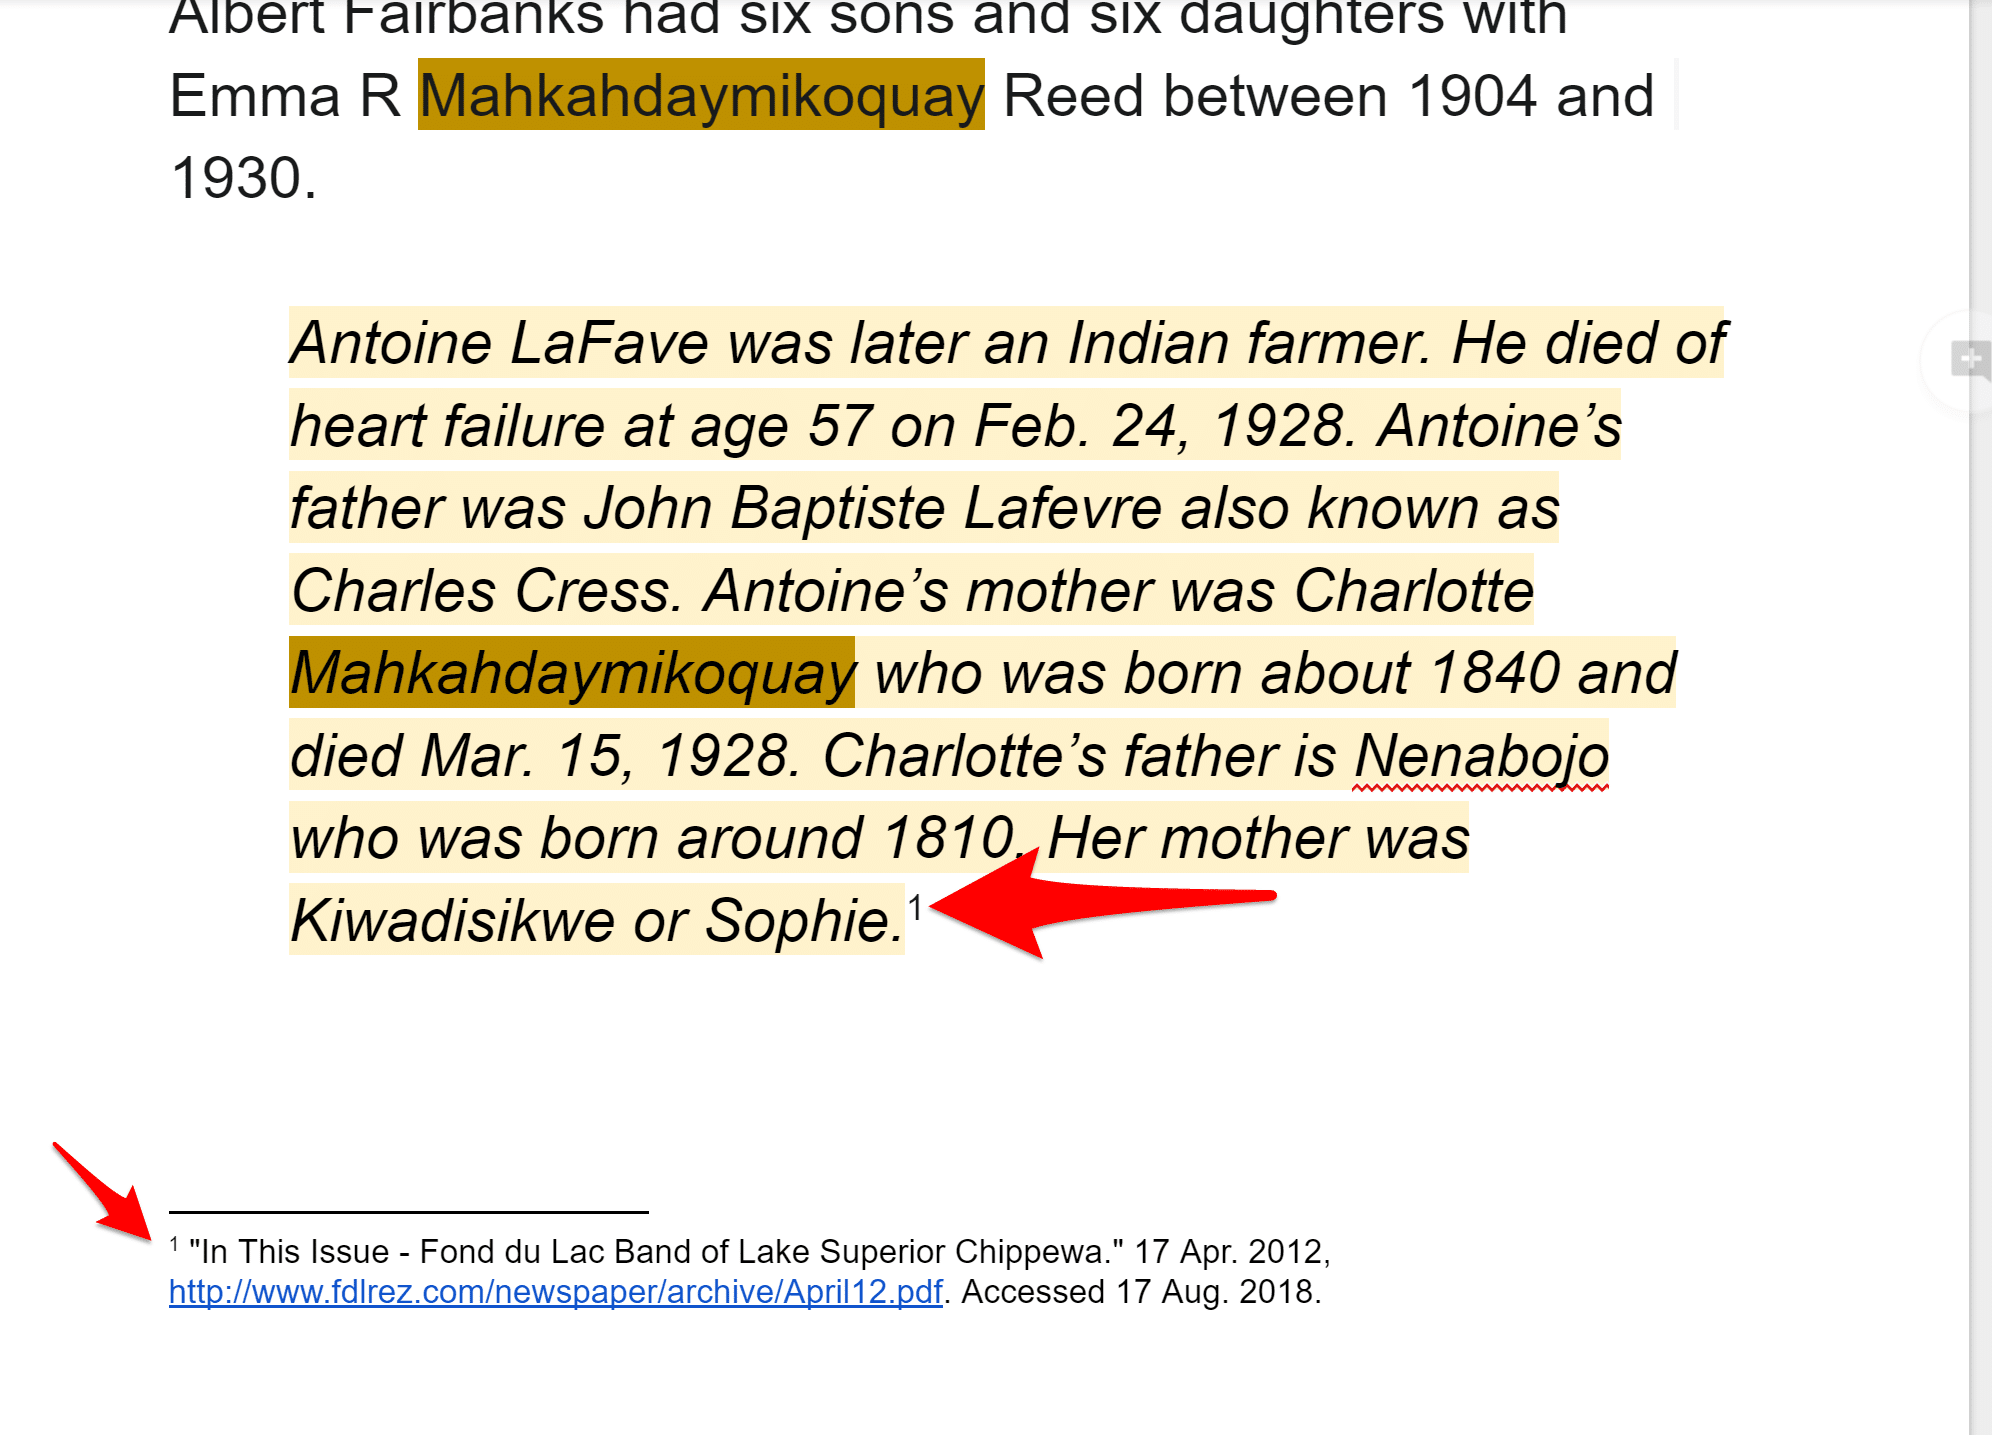
We also formatted the pasted text above with some indenting and highlighting to show that it was new information that we need to do further research on and not part of our existing, evidenced research. We also used highlighting to connect key terms in the existing and new data.
This quick citing option is extremely helpful in so many regards, from citing text we copied into our document to creating a quick list of pages we want to explore later (you can create a new document for this purpose and then enter various terms to explore and “cite” resulting pages into footnotes to create a research list for later). Talk about a great way to keep track of, and expand, your research.
Of course, the citation tool does not do a perfect job, but it provides a quick way to track sources. If you are writing a genealogical research paper you will want to educate yourself about citation styles (such as Evidence Style created by Elizabeth Shown Mills – an extension of the Chicago Manual Style). Google allows you to pick MLA, APA or Chicago from the dropdown at top right.
Images: If you would like to add an image to your research from the Images tab simply drag and drop it in and Google will automatically link to the source (but will not make an actual citation).
Page Explore: You can also access Explore functions by clicking on the star shaped icon on the bottom right of your screen and under Tools in the top menu. This will attempt to Explore your entire document and the results generally showcase information about specific locations, major figures and events. This method of using Explore can be helpful if you are studying a notable ancestor or event or want to learn more about select people, places, events or groups you encounter in your research.
Step 4 – Be Creative With Your Explorations
Whether you are trying to discover more information about facts you already have, turn up new facts, or answer a specific question, you will want to be creative with how you phrase the text you intend to explore.
You may want to try Exploring a whole paragraph (although this is usually too much for Google and it will return no results) or just a single word. Usually, however, a sentence is a good start.
Just like with a regular search you can reformat your information to increase your chances of discovering something new. This can include placing words in quotations, excluding results with a minus sign, adding or removing words, names, dates or locations and other search tricks.
Here are some of the ways that we may phrase our question about Albert and Emma’s marriage to find an answer. Each one of these phrases, when explored in our document, will return unique results.
- When did Albert Fairbanks marry Emma Reed in Minnesota? Before 1904?
- When did “Albert Fairbanks” marry “Emma Reed” in Minnesota?
- “Albert Fairbanks” married Emma Reed in…
- Marriage of Albert Fairbanks and Emma Reed in Minnesota OR Wisconsin 1900..1905
- Minnesota Marriages Reed Fairbanks
- Wisconsin Marriages “Reed” “Fairbanks”
- When did Albert Fairbanks marry Emma Reed in Minnesota? -Ancestry
Get creative with how you phrase your information and edit your sentences as you would a search before Exploring. You may even want to add in variations as separate text and leave your original text in place as well (use the highlighter tool in the menu to organize this data visually).
Step 5 – Add New Details to Your Tree
Obviously you will want to add some newly found information to your tree. But be careful. Make sure that you have an actual valid source for each fact you discover before adding it to your permanent files. A forum post, another person’s family tree or details you find listed on a random website are not a valid source.
Instead, look for facts that come from actual historical records or transcribed information from those records that are listed on archive, historical society, library and genealogy research websites.
As with any genealogical research, know where the information you are looking at comes from and check that the information is correct against the original record whenever possible. If the information is not connected to an original record, look for additional sources to verify the data. Never make assumptions, always have evidence.
And, when adding facts to your family tree, be sure to also add your source citation and the record itself (when possible).
There are many, many sources of solid genealogical information online that exist outside of the major paid and free family history search sites and using Explore from Google Docs is just one way to discover them.
Happy researching!
You Might Also Like to Read:
- 6 ‘Secret’ Google Search Tricks for Genealogy That’ll Help You Find Your Ancestors
- Google Image Search for Genealogy: How to Use Your Family Photos to Expand Your Research
- Why You Need to Quit Attaching Records to Your Family Tree, and What to Do Instead
Image: Young woman typing. c1906. Library of Congress.
By Melanie Mayo, Family History Daily Editor
Secret note from Karen’s middle school English teacher: the contraction for “you are” is “you’re,” not “your.”
This article sucked because you pretended to offer some secret way of finding new facts, instead your just recruiting users to using more Google crap. I Hate wasting my time following misleading headlines!
Thank you. I like how adding the question to the document gives you your search parameters right off the bat. That looks like a great research tool. The Rootsfinder web clipper app works in a similar manner but links directly to the tree and individuals in the records. I’m still exploring that tool too.
Thank you for sharing this hidden gem. I hope I can break through a brick wall with this method!